Aqara RocketMQ Bridge setup


This page shows how to connect Aqara Message Queue Push to Home Assistant with the aqara-rocketmq-bridge service and the ha_aqara_devices integration.
It covers two supported paths:
| Home Assistant installation | Bridge installation path | Typical integration Bridge URL |
|---|---|---|
| Home Assistant Container | Run the bridge with Docker or Compose | http://aqara-rocketmq-bridge:8080 |
| Home Assistant OS | Install the Home Assistant add-on from this repository | http://HOME_ASSISTANT_IP:8080 or your reverse-proxy URL |
Useful links:
- Aqara developer console: https://developer.aqara.com/
- Aqara Message Push docs: https://opendoc.aqara.com/en/docs/developmanual/messagePush/messagePushMode.html
- Bridge repository: https://github.com/Darkdragon14/aqara-rocketmq-bridge
- Home Assistant integration repository: https://github.com/Darkdragon14/ha-aqara-devices
How it works
Aqara RocketMQ -> aqara-rocketmq-bridge -> SSE -> ha_aqara_devices -> Home Assistant
The bridge does two things:
- consumes Aqara RocketMQ messages with your Aqara developer credentials;
- exposes
GET /healthandGET /eventsfor Home Assistant.
The ha_aqara_devices integration remains responsible for Aqara Open API authentication and config.resource.subscribe calls.
What you need before starting
- an account Aqara developer;
- the project
APP_ID; - the matching
KEY_IDandAPP_KEYfrom AqaraKey managementfrom your region; - a strong
BRIDGE_TOKENthat Home Assistant will use forGET /events; - a stable URL or reachable address for the bridge;
- the
ha_aqara_devicesHome Assistant integration.
Most of the Aqara values used in this guide come from the Aqara developer console:
APP_ID: your Aqara project ID;KEY_IDandAPP_KEY: fromKey management;MQ_NAMESRV_ADDR: fromMessage push.
BRIDGE_TOKEN is different: Aqara does not provide it. You choose this secret yourself, and Home Assistant must use the same value to connect to the bridge.
Aqara API quotas and sizing
Aqara documents the following limits for ordinary developer accounts:
100,000API calls per month on the free quota;2,000,000API calls cumulatively;300API calls per5 minutesfor non-paid developer accounts;- up to
80accessible devices for non-paid enterprise or individual developers; - up to
300accessible devices for individual paid developers.
The current Home Assistant integration behavior can consume roughly this many Aqara Open API calls per month for the following device types:
FP2->~43,200 / monthFP300->~25,920 / monthM3->~8,640 / monthG3->~17,280 / month
Use this estimate to size your setup:
Estimated total / month ~= FP2*43200 + FP300*25920 + M3*8640 + G3*17280
Examples:
1 FP2 + 1 FP300 + 1 M3 + 1 G3->~95,040 / month2 FP2 + 1 G3->~103,680 / month
Aqara also documents a separate limit of
300 API calls per 5 minutesfor non-paid developer accounts. If you manage many devices, keep extra margin for setup, token refresh, resubscription, and other short bursts.
These values are estimates based on the current integration behavior. Other Aqara API calls can also consume quota.
Step 1 - Create an account Aqara developper
- Create an account at https://developer.aqara.com/ and open the console.
- Copy the project
appIdand save it asAPP_ID. - Open
Key managementand copy the generatedKey IDandApp Key. - Keep those values safe. You will reuse the same
APP_ID,KEY_ID, andAPP_KEYin both the bridge and the Home Assistant integration.
Step 2 - Configure Aqara Message Push
Open your project details and go to Message push.
Use these settings:
- Select the correct Aqara region for your project.
- Choose
Get messages based on message queue. - Select the same
Key IDthat you want to use for the bridge. - Enable push.
- Keep
User-defined subscription mode.
Why User-defined subscription mode matters:
- the Home Assistant integration subscribes only to the resources it needs;
- the bridge then relays those updates over
/events.
The values shown by Aqara map directly to the bridge settings:
| Aqara Message Push field | Bridge value |
|---|---|
MQ message subscription address | MQ_NAMESRV_ADDR |
topic | APP_ID |
group | APP_ID |
accessKey | KEY_ID |
secretKey | APP_KEY |
This Aqara admin screen shows where to find the selected KEY_ID and the values you need to copy into the bridge: MQ_NAMESRV_ADDR, APP_ID, KEY_ID, and APP_KEY.
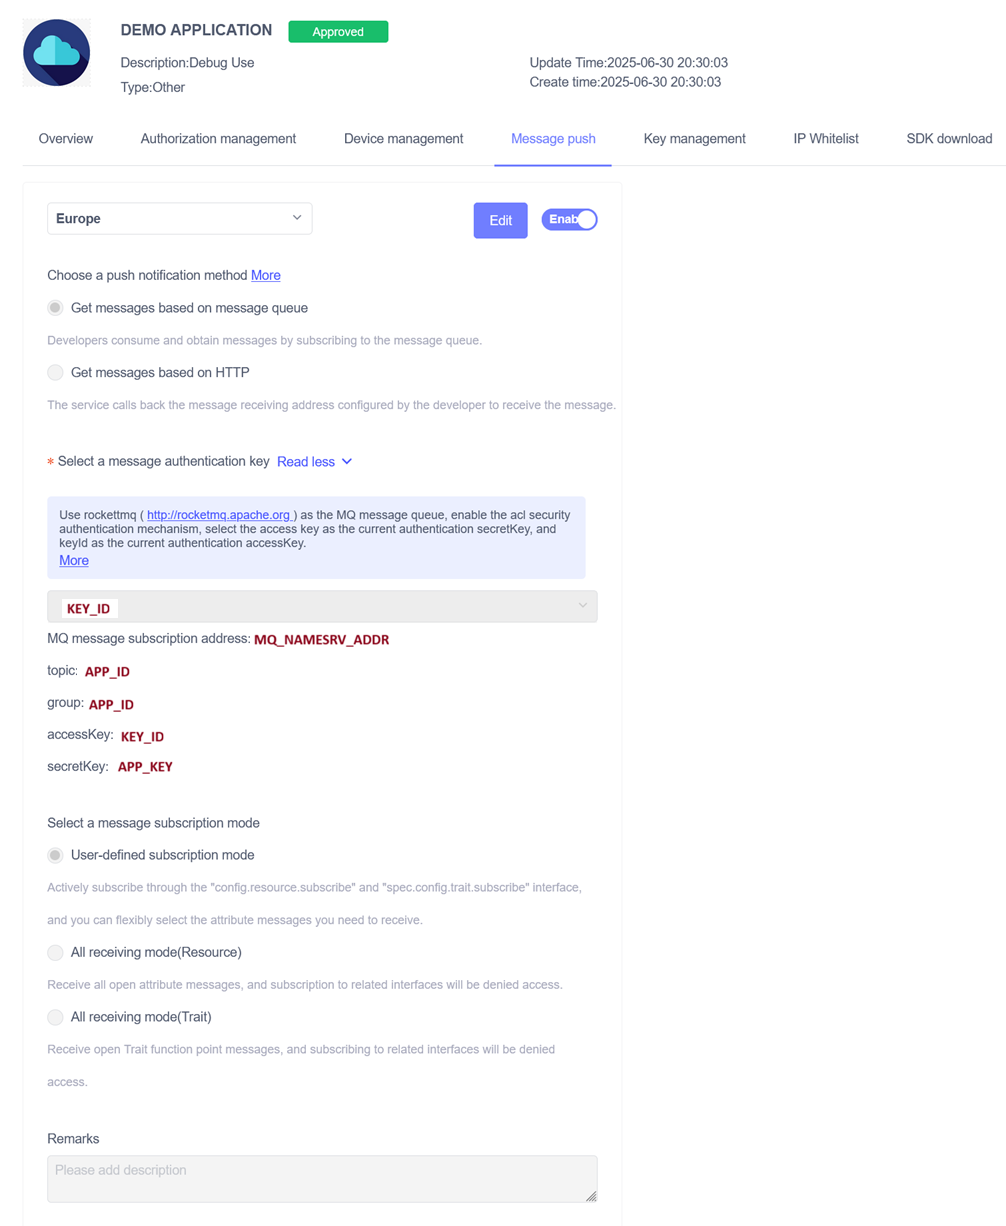
Do not assume 3rd-subscription.aqara.cn:9876 is your real nameserver. Aqara uses that value as an example in their documentation. The correct MQ_NAMESRV_ADDR is the exact value shown in your own Message push page.
Step 3 - Understand BRIDGE_PUBLIC_URL vs Home Assistant Bridge URL
These two values are related, but they are not exactly the same setting.
| Setting | Where you configure it | What it should contain |
|---|---|---|
BRIDGE_PUBLIC_URL | Bridge environment variable or add-on option | The canonical URL the bridge reports in /health. If you expose the bridge through a reverse proxy or tunnel, use that HTTPS URL. Aqara does not send messages to this URL. |
Bridge URL | ha_aqara_devices config flow in Home Assistant | The exact URL that Home Assistant can call for GET /health and GET /events. |
Examples:
- shared Docker network:
http://aqara-rocketmq-bridge:8080 - Home Assistant OS add-on exposed on the host:
http://HOME_ASSISTANT_IP:8080 - reverse proxy or Cloudflare Tunnel:
https://bridge.example.com
If you already have a clean external URL, using the same value in both places keeps the setup easy to reason about.
Step 4 - Choose your Home Assistant installation type
Use only one of the following paths.
Path A - Home Assistant Container
Use this path if Home Assistant itself runs in Docker and can reach the bridge over a shared Docker network.
1. Run the bridge container
Example compose.yaml service:
services:
  aqara-rocketmq-bridge:
    image: ghcr.io/darkdragon14/aqara-rocketmq-bridge:main
    container_name: aqara-rocketmq-bridge
    restart: unless-stopped
    ports:
      - "8080:8080"
    environment:
      APP_ID: your-app-id
      KEY_ID: your-key-id
      APP_KEY: your-app-key
      BRIDGE_TOKEN: change-me
      MQ_NAMESRV_ADDR: your-message-push-nameserver
      BRIDGE_PUBLIC_URL: https://bridge.example.com
    networks:
      - homeassistant

networks:
  homeassistant:
    external: true
Aqara does not send messages to BRIDGE_PUBLIC_URL. Message delivery comes from RocketMQ, and the bridge consumes that queue directly. Bridge URL is the setting that Home Assistant uses to reach /health and /events.
You can also run the published image directly:
docker run --rm -p 8080:8080 \
  -e APP_ID=your-app-id \
  -e KEY_ID=your-key-id \
  -e APP_KEY=your-app-key \
  -e BRIDGE_TOKEN=change-me \
  -e MQ_NAMESRV_ADDR=your-message-push-nameserver \
  -e BRIDGE_PUBLIC_URL=https://bridge.example.com \
  ghcr.io/darkdragon14/aqara-rocketmq-bridge:main
For MQ_NAMESRV_ADDR, copy the exact value shown as MQ message subscription address on the Aqara Message push page.
2. Pick the integration Bridge URL
If Home Assistant and the bridge share the same Docker network, the simplest value is:
http://aqara-rocketmq-bridge:8080
That is also the integration default.
3. Verify basic container reachability
Run this from somewhere that can reach the bridge:
curl http://aqara-rocketmq-bridge:8080/health
You should get JSON back from the bridge.
Path B - Home Assistant OS
Use this path if you run Home Assistant OS and want the bridge as a managed add-on.
1. Add this repository as a third-party add-on repository
- Open the Home Assistant add-on store.
- Open the repositories dialog.
- Add this repository URL:
https://github.com/Darkdragon14/aqara-rocketmq-bridge
- Refresh the store if needed.
2. Install the Aqara RocketMQ Bridge add-on
The add-on supports amd64 and aarch64.
Fill the add-on options with the same Aqara project values:
| Add-on option | Value |
|---|---|
app_id | Aqara APP_ID |
key_id | Aqara KEY_ID |
app_key | Aqara APP_KEY |
bridge_token | Your chosen SSE bearer token |
mq_namesrv_addr | Copy MQ message subscription address from the same Aqara Message push page |
bridge_public_url | The stable URL you want to use for the bridge |
Then:
- Save the configuration.
- Install the add-on.
- Start the add-on.
- Keep port
8080available so the integration can reach the bridge.
3. Pick the integration Bridge URL
For the add-on path, use a URL that Home Assistant can reach on the host, for example:
http://HOME_ASSISTANT_IP:8080
If you already expose the bridge through a reverse proxy, use that URL instead.
4. Verify the add-on
From another machine on the same network, try:
curl http://HOME_ASSISTANT_IP:8080/health
If the add-on is running and port 8080 is exposed correctly, the bridge should answer with JSON.
Step 5 - Install and configure the ha_aqara_devices integration
1. Install the integration
Recommended path: install it with HACS.
- Open HACS.
- Search for
Aqara Devices. - Install it.
- Restart Home Assistant.
If you prefer manual installation, copy custom_components/ha_aqara_devices into your Home Assistant custom_components directory and restart Home Assistant.
2. Run the config flow
In Settings -> Devices & Services -> Add Integration, search for Aqara Devices.
The integration asks for these fields:
| Field in Home Assistant | What to enter |
|---|---|
Aqara account (email or phone) | Your Aqara login identifier |
Region | The Aqara region that matches your account and project |
Bridge URL | The bridge URL from Path A or Path B |
Bridge token | The same token as BRIDGE_TOKEN or bridge_token |
App ID | The same Aqara APP_ID |
App key | The same Aqara APP_KEY |
Key ID | The same Aqara KEY_ID |
If your Aqara account region is set to Other, that value may not be selectable in the integration. In that case, switch the Aqara account region to another region supported by the Aqara V3 API, as available in the Aqara Developer console, then re-add the affected device in the Aqara Home app before retrying discovery.
3. Enter the authorization code
After the first form, Aqara sends a verification code to your email address or phone number.
Enter that code in the Authorization code step to finish the config flow.
4. What happens after setup
Once the integration starts successfully, it will:
- validate the bridge with
GET /health; - connect to
GET /eventswithAuthorization: Bearer <bridge token>; - call Aqara Open API subscription endpoints in
User-defined subscription mode; - create entities for supported Aqara devices.
Step 6 - Verify the bridge and the event stream
Health endpoint
GET /health is the quickest check.
curl http://YOUR_BRIDGE_URL/health
Typical fields:
{
  "status": "up",
  "rocketmqEnabled": true,
  "rocketmqStarted": true,
  "lastMessageAt": "2026-04-10T10:00:00Z",
  "publicUrl": "https://bridge.example.com",
  "nameserver": "your-message-push-nameserver",
  "lastError": null
}
Interpretation:
up: the RocketMQ consumer is started;starting: the bridge is up, but RocketMQ is not ready yet;degraded: RocketMQ was disabled by configuration.
SSE endpoint
GET /events requires the bearer token.
curl -N \
  -H "Authorization: Bearer YOUR_BRIDGE_TOKEN" \
  http://YOUR_BRIDGE_URL/events
Expected behavior:
- the first event is a
snapshot; - later updates arrive as batched events;
- heartbeat comments are sent periodically to keep the stream alive.
Example payload:
{
  "type": "snapshot",
  "cursor": 42,
  "events": [
    {
      "type": "resource_report",
      "subjectId": "lumi.xxx",
      "resourceId": "3.51.85",
      "value": "1",
      "time": 1710000000000,
      "statusCode": 0
    }
  ]
}
Home Assistant side
When everything is wired correctly:
- the integration loads without
ConfigEntryNotReadyerrors; - bridge health checks succeed;
/eventsstays connected;- entity state changes start to reflect live Aqara updates.
Troubleshooting
GET /health stays on starting
Check these first:
APP_ID,KEY_ID, andAPP_KEYall belong to the same Aqara project;Message pushis enabled in Aqara;- the selected
Key IDinMessage pushmatches the one used by the bridge; MQ_NAMESRV_ADDRis correct for your project region.
GET /events returns 401 Unauthorized
Your Home Assistant integration is using the wrong bridge token. Make sure the integration Bridge token matches the bridge BRIDGE_TOKEN exactly.
The integration cannot connect to the bridge
Usually the issue is the Bridge URL.
- On Home Assistant Container, prefer the Docker service name on the shared network.
- On Home Assistant OS, prefer the Home Assistant host IP on port
8080, or your reverse-proxy URL. - Make sure the URL you enter is the one Home Assistant can actually reach, not just the one your browser can reach.
No events arrive in Home Assistant
Check all of the following:
- Aqara
Message pushis set toGet messages based on message queue; - subscription mode is
User-defined subscription mode; - the integration finished setup and entered the authorization code successfully;
- supported devices are present in the Aqara account tied to the project.
A device is not discovered when the Aqara account region is Other
If your Aqara account region is set to Other, that value may not be available in the integration or Aqara project settings. In that case, one or more devices may not be discovered even if the rest of the setup looks correct.
Try this:
- switch the Aqara account region to another region supported by the Aqara V3 API, as available in the Aqara Developer console;
- re-add or reinstall the affected device in the Aqara Home app;
- rerun the integration setup with the matching region.
The add-on repository does not appear in Home Assistant OS
Refresh the browser and check the Supervisor logs. Home Assistant expects a valid repository.yaml at the repository root.
I want a public HTTPS URL
That works well.
- Put the public URL in
BRIDGE_PUBLIC_URL. - Use the same URL as the integration
Bridge URLif Home Assistant can reach it. - If you use Cloudflare Tunnel or another reverse proxy, point it to the bridge on port
8080.
Table of contents
- How It Works
- What You Need Before Starting
- Aqara API Quotas and Sizing
- Step 1 - Create an Account Aqara Developper
- Step 2 - Configure Aqara Message Push
- Step 3 - BRIDGE_PUBLIC_URL vs Bridge URL
- Step 4 - Choose Your Home Assistant Installation Type
- Step 5 - Install and Configure ha_aqara_devices Integration
- Step 6 - Verify the Bridge and the Event Stream
- Troubleshooting